A Machine Learning Engineer’s Toolkit
Bash aliases, Vim, and useful VSCode extensions
As an AI/ML Engineer (this applies to Software Engineers as well), the faster one can crunch out code, the greater our efficiency. Engineers are often good at their craft, but few try to squeeze out efficiencies in their day-to-day to maximize those gains.
These efficiencies or life hacks as I’d like to call them, may seem so insignificant to some but over time, really do add up to a lot. For example, cutting down 1000 keystrokes a day is equivalent to 365,000 keystrokes a year, and assuming an average word length of 5, this saves you typing 73,000 words, and further assuming a modest typing speed of 80 words per minute, saves one approximately 15 hours!
Here are some tips and tricks to get you started on your journey towards being a 10X engineer (wait, is that still a thing 😶?).
This article is broken down into several sections:
- Bash Aliases
- Vim
- VSCode Extensions
Bash Aliases
As an AI Engineer, we often use the terminal or command-line to do many day-to-day activities. The most common use cases include using conda/pip to manage our development environments and other command line interfaces (CLI) like Git and Docker.
What are bash aliases?
A bash alias is a method of supplementing or overriding Bash commands with new ones. Bash aliases make it easy for users to customize their experience in a POSIX terminal [1].
In short, they are shortcuts so that we do not have to repeatedly type the same bash commands over and over again.
In case you didn’t know, whenever you launch the terminal, your ~/.bashrc file or ~/.bash_profile is loaded. Of course, not all distributions come with pre-populated aliases, hence the need to manually populate them once so that we can reuse them in the future.
To create a new ~/.bashrc file or ~/.bash_profile, type vi ~/.bashrc or vi ~/.bash_profile in the terminal. This opens the file in VIM and you may start adding aliases.
Examples
Here are some generic aliases that you can use:
# Copy current working dir and cd into it from somewhere else
alias cpath='pwd|pbcopy'
alias ppath='cd "$(pbpaste)"'

# Conda
alias condaa='conda activate'
alias condad='conda deactivate'
alias condal='conda list'
alias condalg='conda list | grep'
alias condar='conda remove --name'
alias condael='conda env list'
alias condaec='conda env create --file'

# Others
alias jn='jupyter notebook'
alias ipy="ipython --InteractiveShellApp.extensions="['autoreload']" --InteractiveShellApp.exec_lines="['%autoreload 2']""
alias ..='cd ..'
alias ....='cd ../..'
Here are some examples for the Git CLI (feel free to personalize this!):
alias gpom='git pull origin master'
alias gmo='git merge origin'
alias gc='git checkout'
alias gs='git status'
alias gcm='git commit -m'
alias ga='git add'
alias gb='git branch'
alias gf='git fetch'
alias gp='git pull'
alias gr='git restore'
alias push='git push origin'
alias pull='git pull origin'
alias stash='git stash'
alias sapply='git stash apply'
If you are in the same bash session, you can manually reload this bash profile you just configured by typing source ~/.bashrc (or source ~/.bash_profile). Either that, or you can close the current terminal session and reload a new one. You can then try out those new aliases you have created.
Here are some more example aliases for the Docker CLI:
alias dcp='docker container prune -f'
alias di='docker images'
alias dpa='docker ps -a'
alias dp='docker pull'
alias drf='docker rmi -f'
As you can see, the possibilities of aliases are endless so start using them and cut down those keystrokes as much as you can!
Wrapping up on aliases
Update 2022-06-13: I have since moved my aliases from ~/.bashrc to ~/.local/include as I did not want to bloat up my ~/.bashrc file which typically contains other initializations commands from conda, zsh, etc. My setup is as such:
# in `~/.bashrc`
for file in $HOME/.local/include/*;
  do source $file
done

# in `$HOME/.local/include`, put any bash scripts you want to `source`
# here e.g., `my_aliases.sh`, `my_functions.sh`
(I will list more examples at the end of the article for other use cases as I believe bash aliases are highly personalized based on one’s usage of the terminal)
VIM
VIM is a text editor that by default comes with inbuilt keyboard shortcuts with the aim of minimizing/removing the need for unnecessary mouse clicks. It also has the capability of recording key strokes and replaying them (i.e. macros).
Personally, I don’t use VIM as my primary interactive development environment (IDE) as it is rather lightweight but I find that it is particularly useful for making quick edits to code/config files while I’m navigating on the terminal. It is however, extremely powerful when used together with the VIM extension on VSCode (which is my primary IDE of choice).
As someone who just picked up VIM not too long ago, here are some key strokes that I think can get you started quickly (80–20 pareto principle, am I right?). Before that, there is one absolutely essential step to do for maximum efficiency: Remapping the Esc key to the Caps Lock key.
Yes, moving your pinky to the Esc key is simply too inefficient.*
Let’s get started.
In VIM, there are 3 modes — Normal, Insert and Visual mode. The default mode is Normal mode and is used mainly to navigate around a file. To edit, Insert mode is used (as the mode name intuitively suggests). Finally, Visual mode allows selection of text which can then be used to perform operations like delete, cut and copy.
Most of the magic happens in Normal mode.
An important thing to note is that all partially issued commands can be negated with the Esc key (or now a.k.a. the Caps Lock key), amongst other things like exiting Insert and Visual mode (to enter Normal mode). Also, do note the difference between lower case and upper case!
Normal Mode
File operations
:q!→ Quit file and discard all changes:w/:wq→ Save file without exiting / Saves and exits
Navigating around a file:
h,j,k,l→ Single line/character movementw,b→ Single word movement$→ Move to end of line0→ Move to start of line/<word>→ Find a word (equivalent ofCtrl-F); e.g.,/bagel→ →nto search through words foundShift-{or}→ Moving across code blocksgg/G→ Move to start/end of file:set number/:<row_num>→ Shows the row number / Jump to row
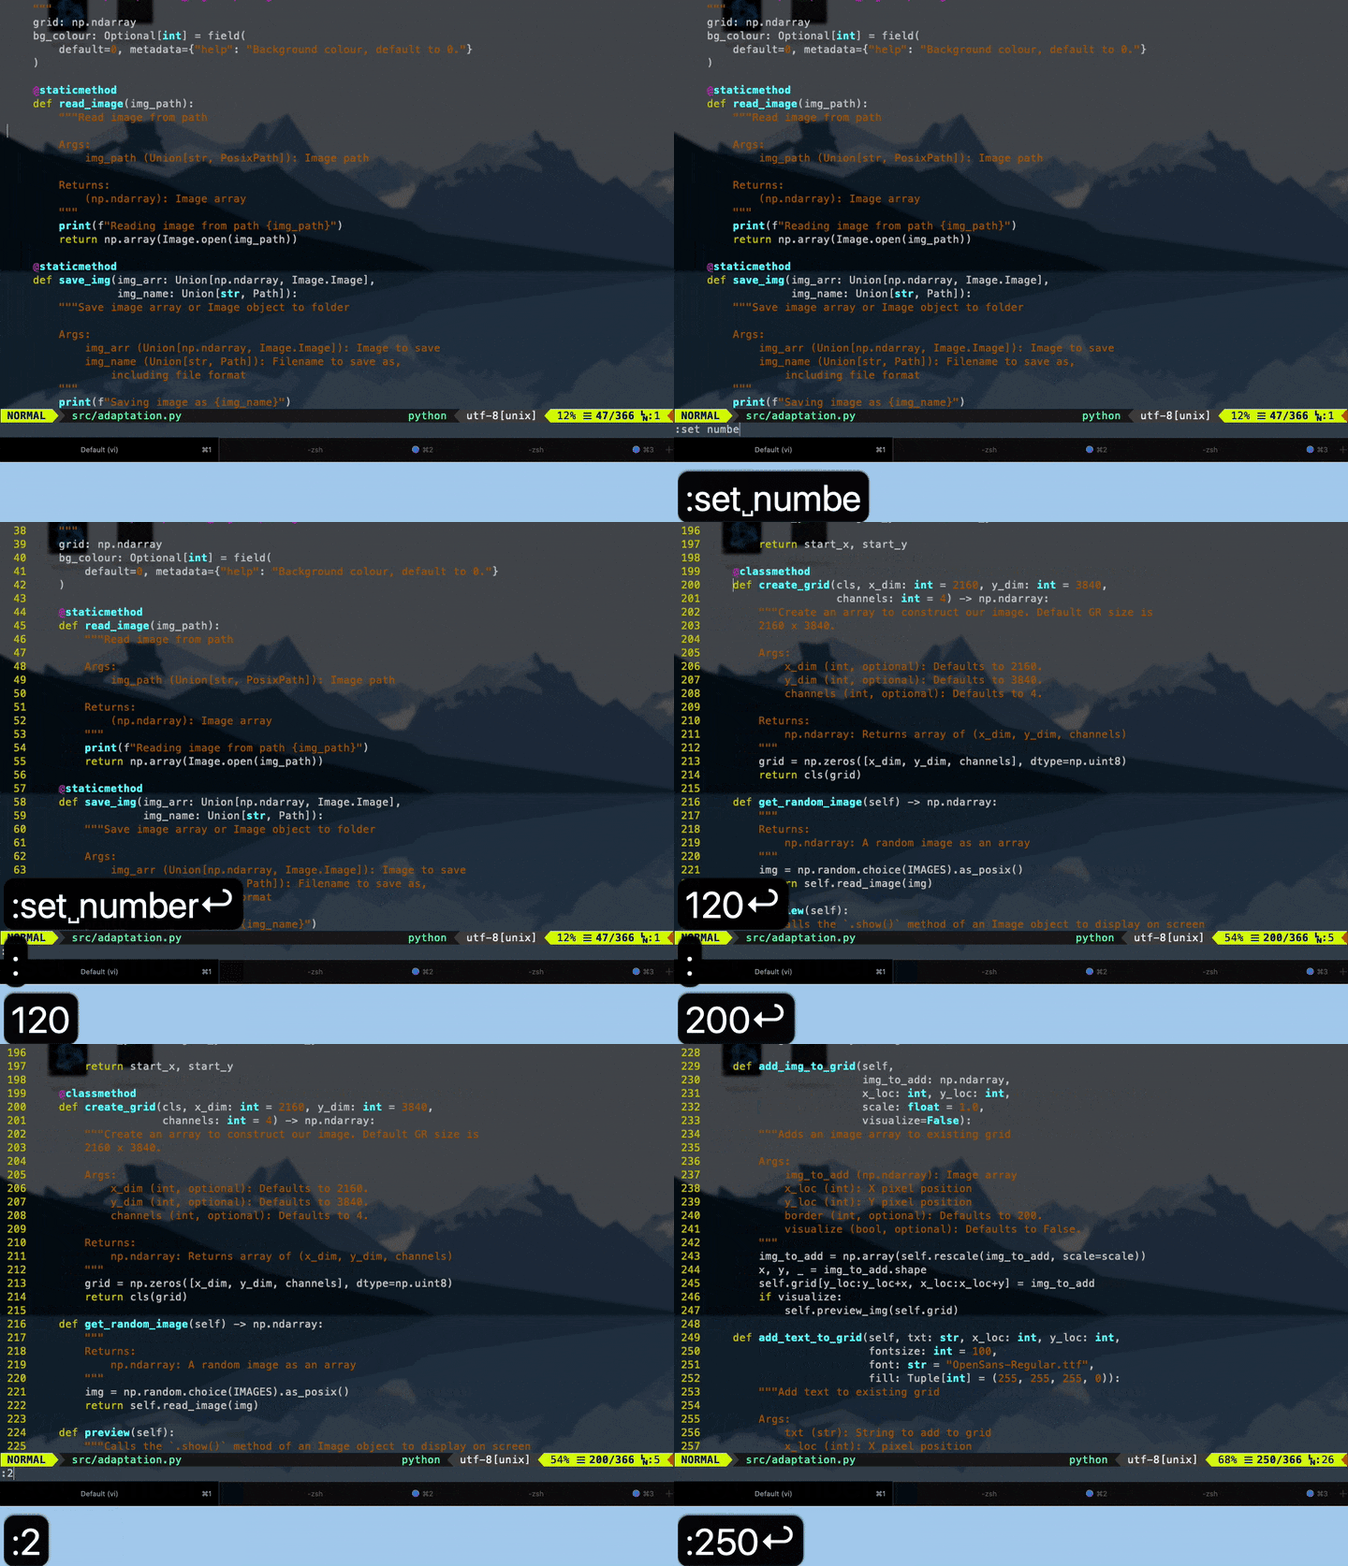
Most common ways to enter insert mode to start editing:
i→ EntersInsertmode where cursor is (a.k.a. insert)a→ EntersInsertmode after cursor (a.k.a. append)A→ Move cursor to end of line and entersInsertmodeC→ Removes all characters after your cursor and entersInsertmode
Miscellaneous useful commands:
~→ Invert character casing%→ Find matching(,[or{r<char_to_replace>→ Replacing a character (e.g.r2replaces current character with “2”)zz→ Centre the cursor to the middle of the screen>>→ Indents the line of code at which your cursor is ond/y→ delete / yank (a.k.a. copy); usually followed up withp(paste) orP(paste in line above)u/Ctrl-r→ undo / redo.→ Redo previous command at your current cursor position. This command is one of my most commonly used commands as it can be extremely handy.
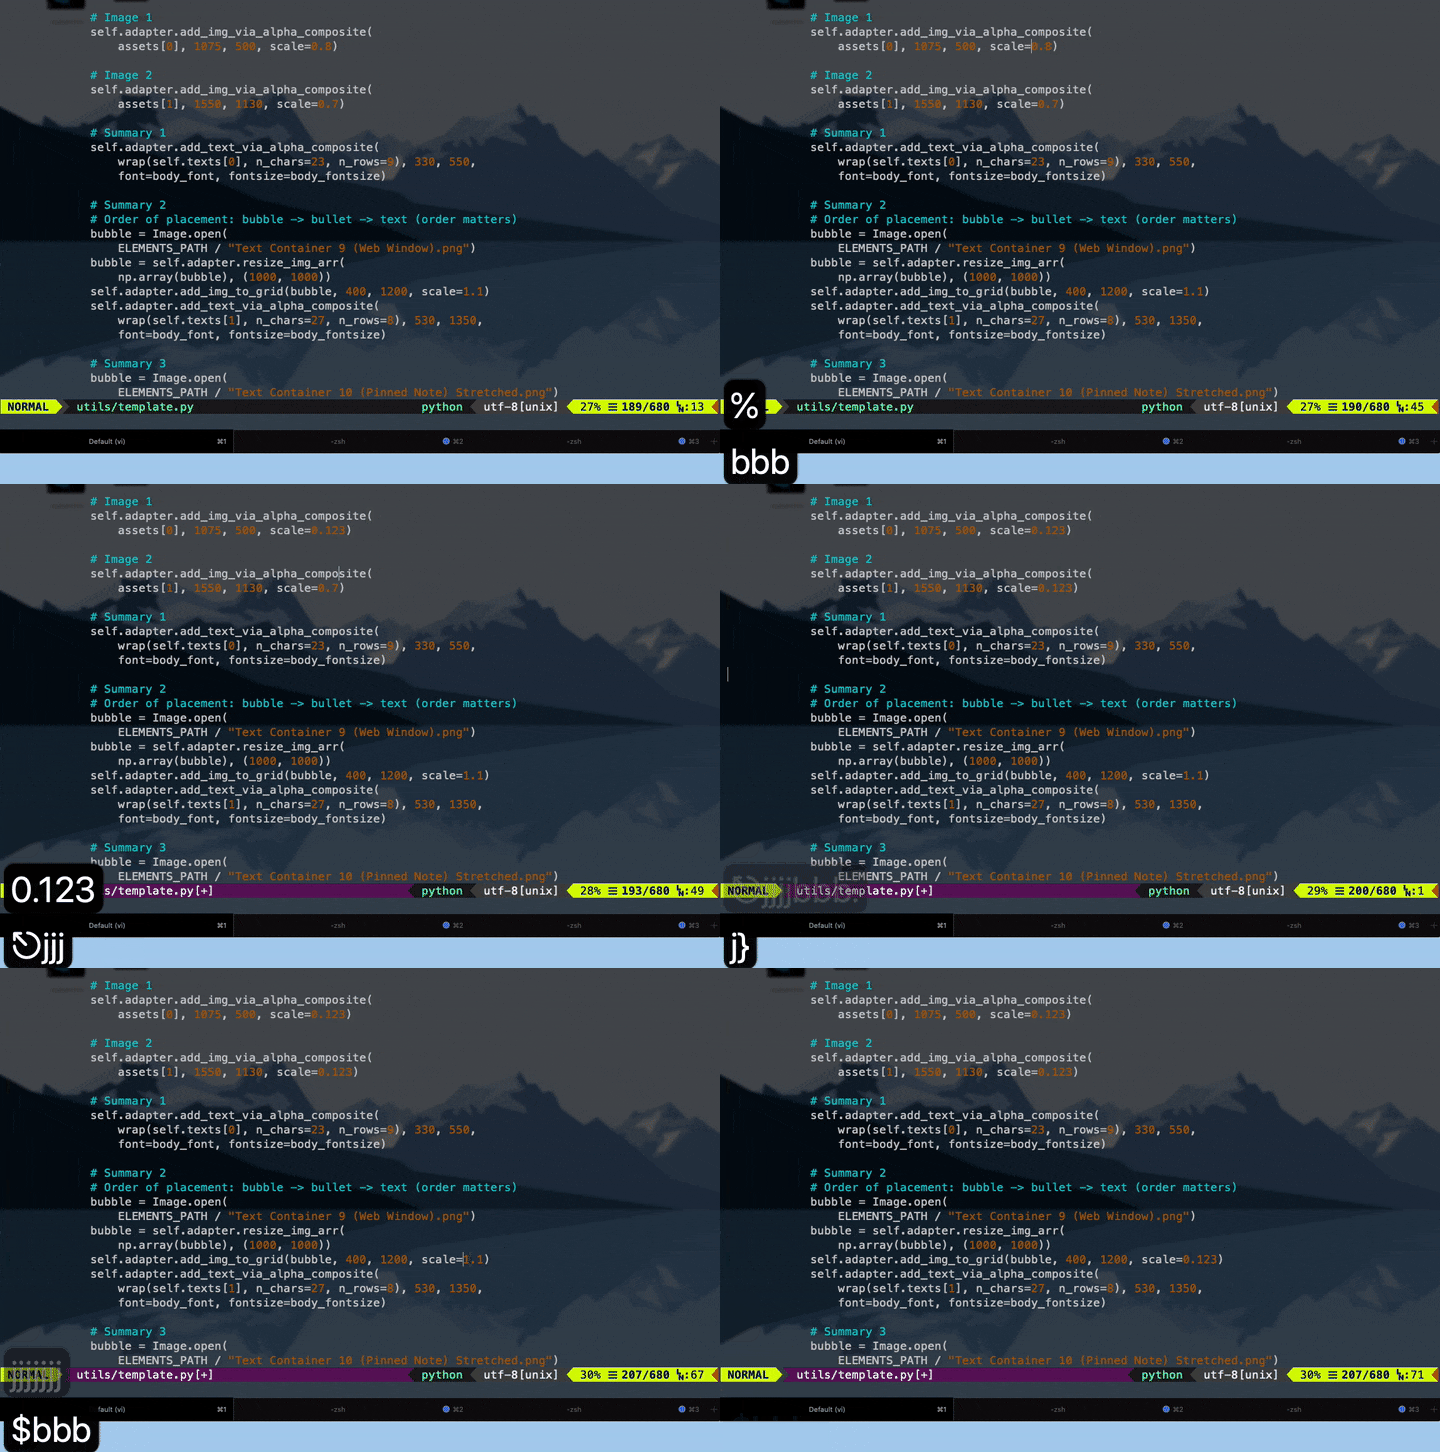
Changing the `scale` parameter in multiple locations conveniently
Visual Mode
Visual mode allows the user to select a series of characters/blocks of code and perform commands such as copying, deleting, indenting and many more.
v→ entersVisualmodeV→ entersVisual Linemode where the entire line is visually selectedCtrl-V→ entersVisual Blockmode
Chaining together commands
There are infinite ways to chain commands together to accomplish a task, but here are some common tasks you’d encounter in your day-to-day. Oh and by the way, you can always include a number n as a prefix to the command you are issuing to execute that command n number of times (e.g., 3j → move 3 lines down).
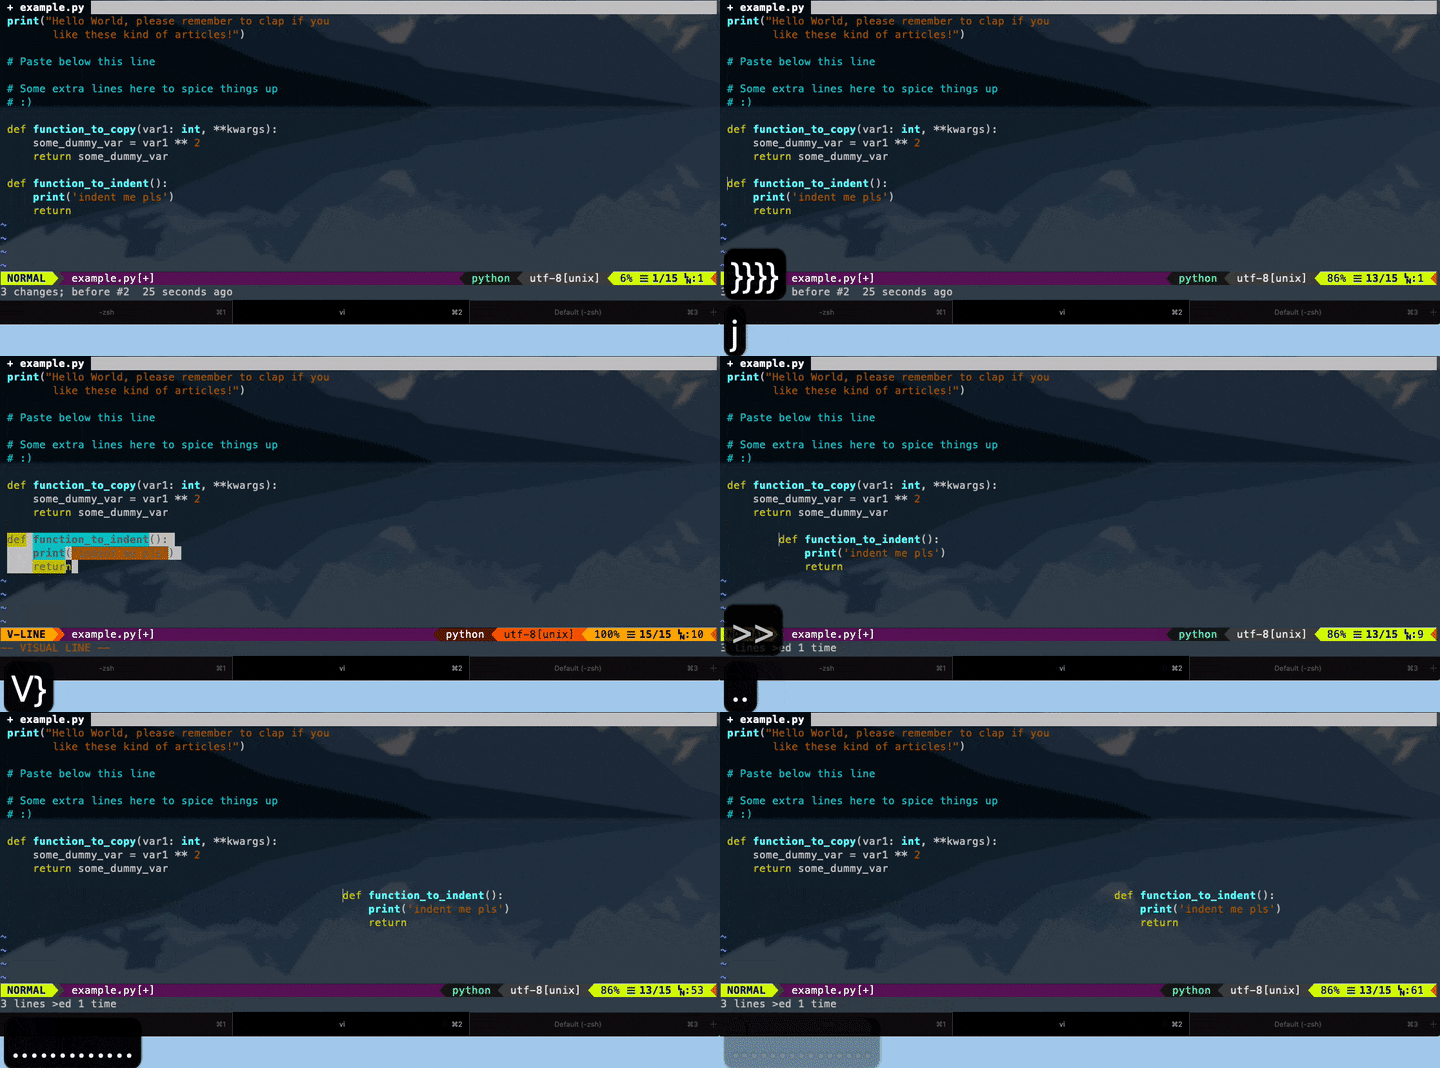
cw/c$: Change next word / Change until end of line (NOTE:ccan be replaced withd, where the main difference is the former entersInsertmode while the latter remains inNormalmode)ct<remove_until_char>: Remove all characters from cursor to character specified (again,ccan be replaced withd)0w– moving to first character of the lineShift-V→Shift-}→y→p: Copying a block of code and pasting it somewhere
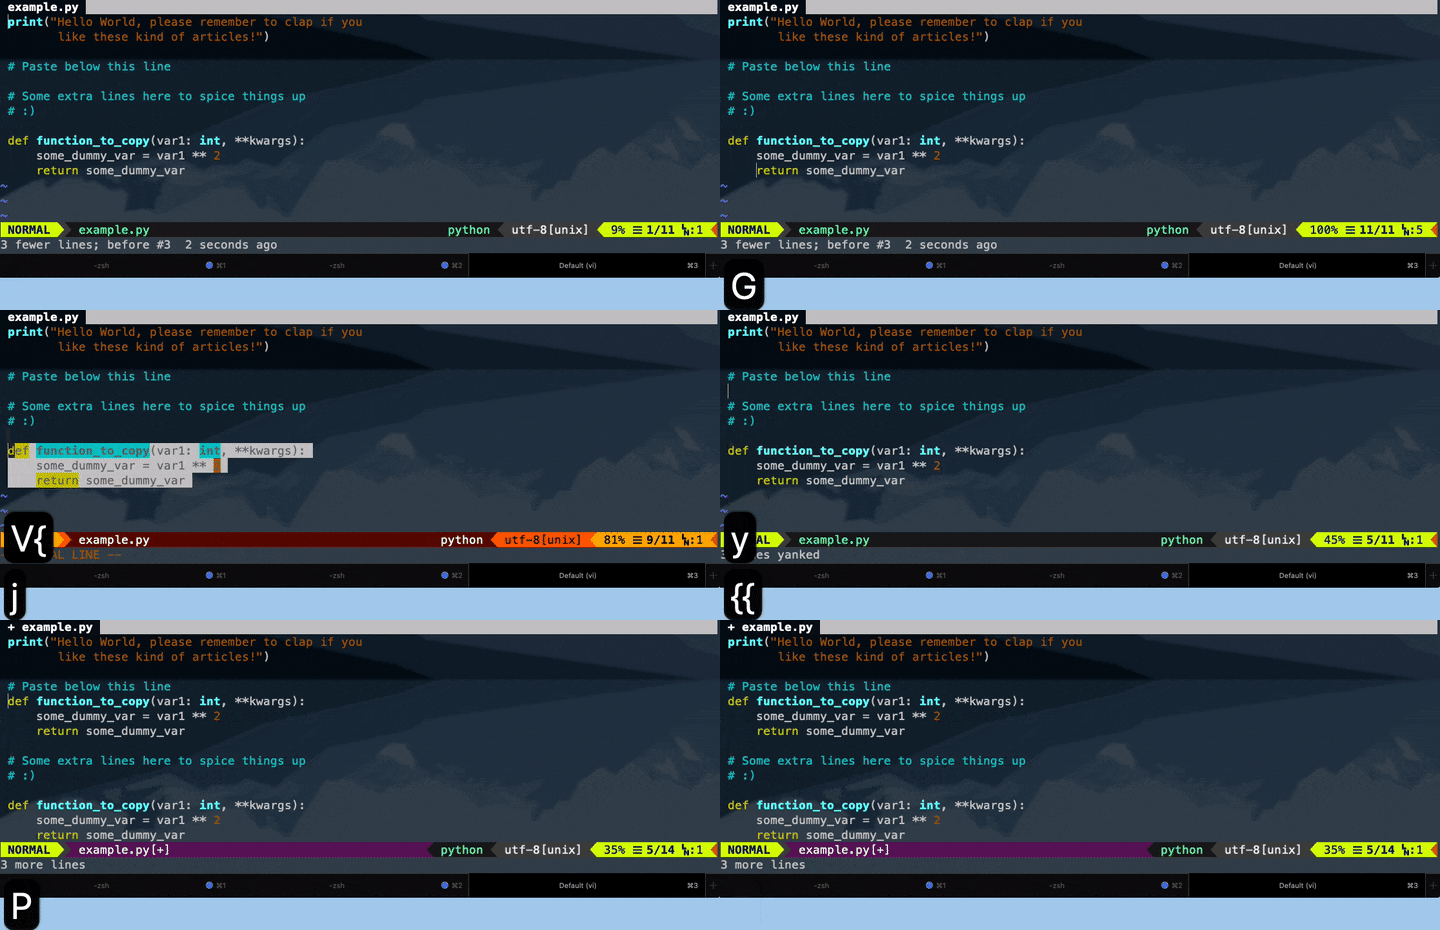
This example copies from the bottom hence uses `{` instead of `}`
5. Ctrl-V → → I → # → Esc : Block comment (assuming character used for commenting is #, otherwise replace accordingly). (NOTE: only a single # will appear at first; the other # characters will appear after Esc is pressed!)
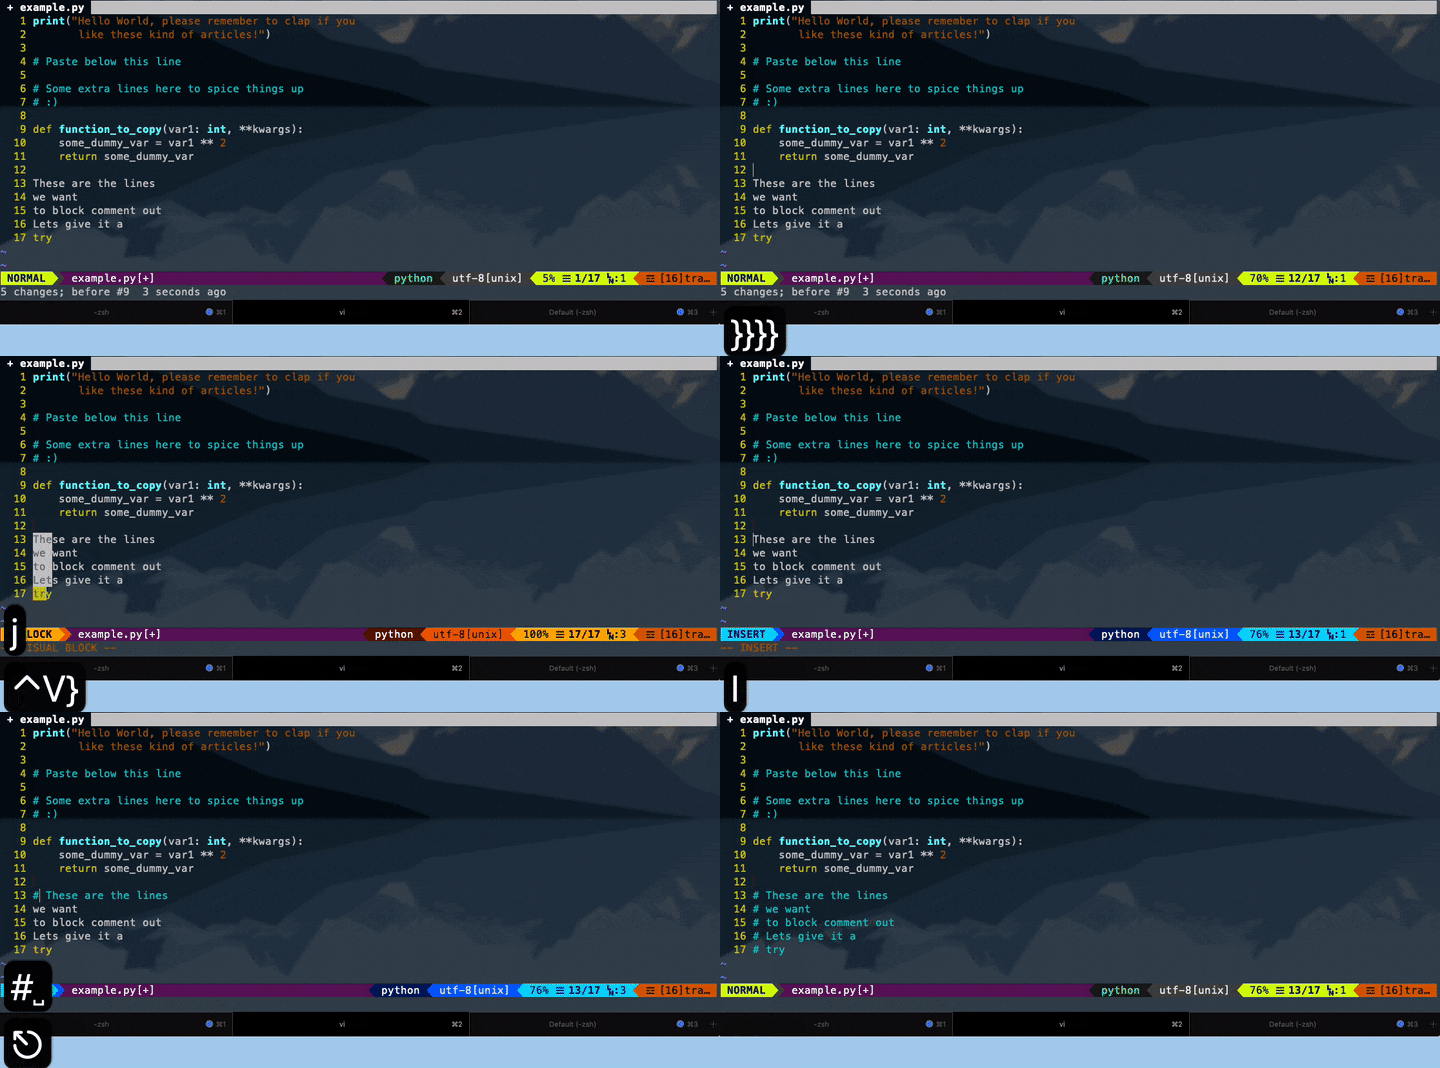
6. V → → >> → . : Indents a block of code multiple times
Practise, Practise & Practise
Learning VIM isn’t easy and it takes a lot of practice to get those muscle memory in place. The amazing thing about VIM is that there are always new commands to learn so keep learning new commands everyday!
Hopefully these are enough to get you started. And of course, a cheatsheet is always helpful. After you’ve gotten a feel of the most common commands you’re using, you can configure your ~/.vimrc file to map certain keystrokes to suit your needs.
VSCode Extensions
VSCode is a great IDE because the community advocates it, alongside the vast number of extensions created for developers, by developers. Every language has its own set of extensions and as a Python developer, here are some must-have extensions that every Python developer should have to boost your productivity.
- Pylance (in preview) — this extension was recently launched by Microsoft and boasts many essential quality-of-life functionalities like code completion, type checking, auto imports and many more.
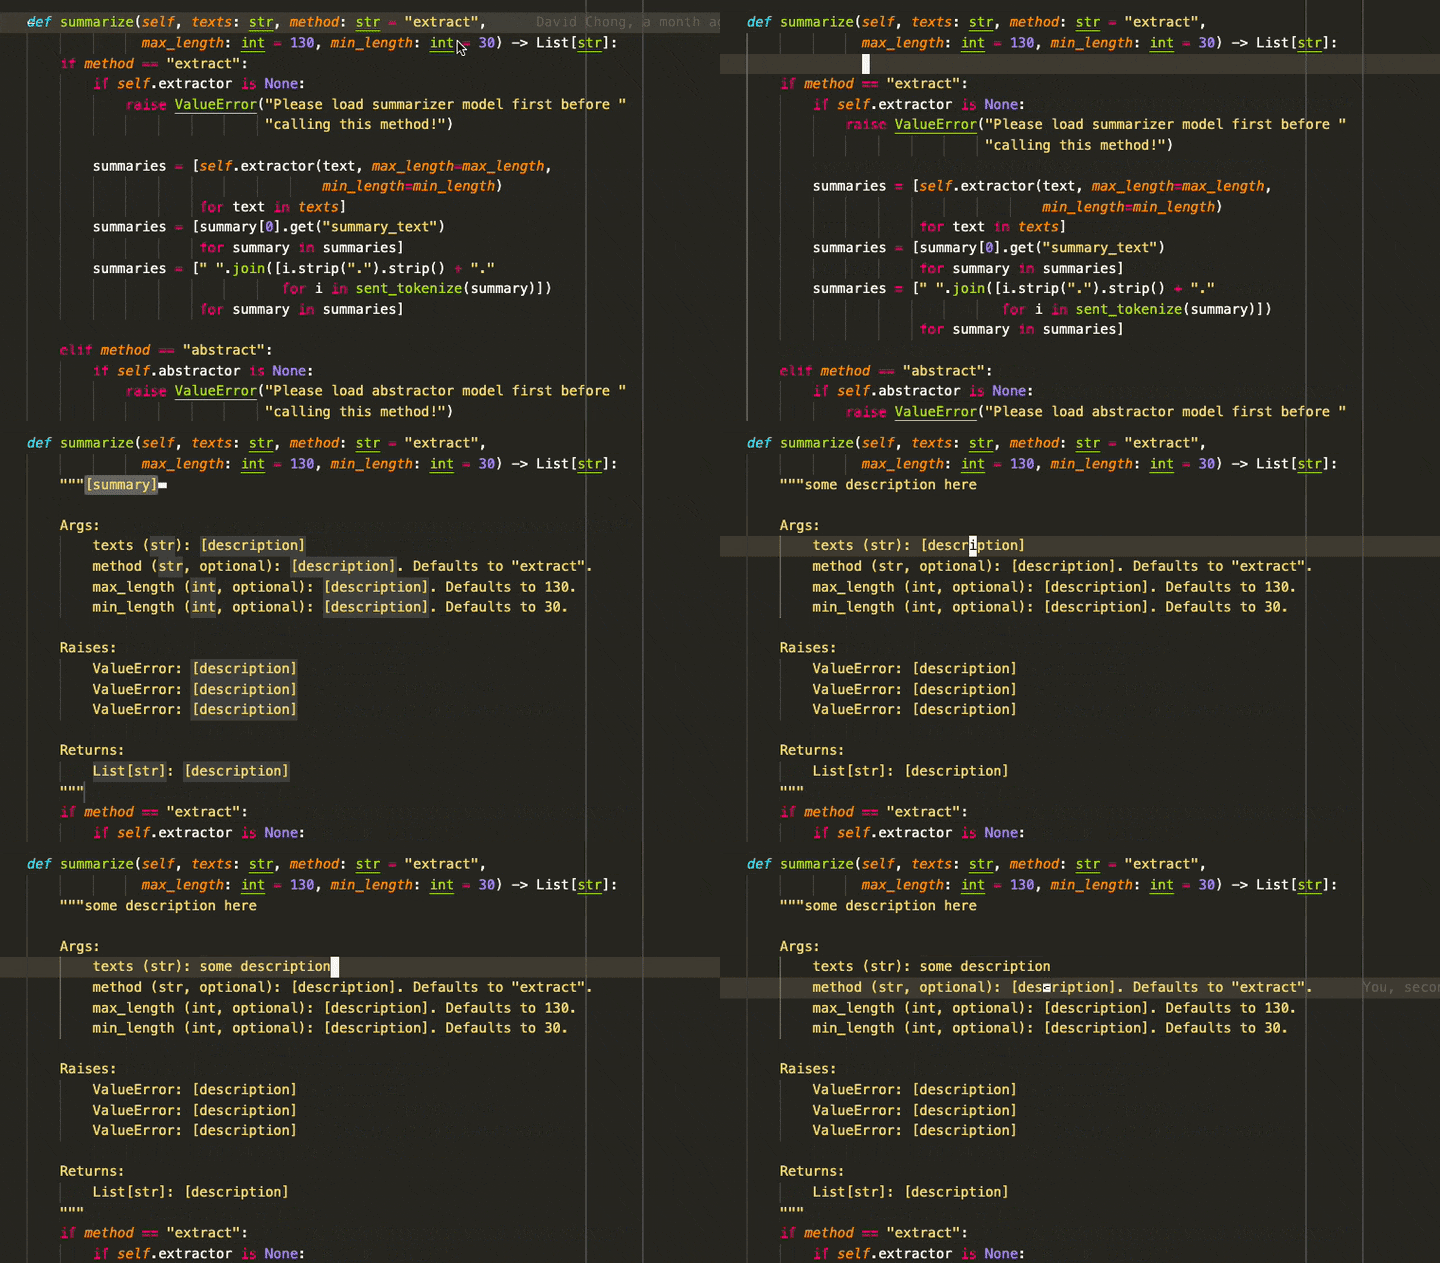
- Python Auto Docstring — as its name suggests, this extension automatically creates docstrings for you based on the function parameters you specified. It even supports a number of docstring styles including Google (default), docBlockr, Numpy and Sphinx (restructured text).
3. Python AutoPEP8 — Alt-Shift-F is your best friend here as it auto-formats your code to PEP8 standard.
4. GitLens [Applicable to all] — an extension that “Supercharges” your Git capabilities. It helps you get a quick glimpse into whom, why and when a line or code block was changed — this means effortless version history, status bar blame, code lens (to see recent changes by whom), hover capabilities and so many more.
5. Prettier [Bonus! Mainly for HTML/CSS/JavaScript] — Ctrl-Shift-P is your best friend to auto-format your code here.
VSCode boasts many other useful extensions that are non-productivity related but aids in many other areas like collaboration (Live Share), containerization (Docker), remote ssh (Remote SSH) and many more.
Extra Readings
Bash aliases:
- https://www.cyberciti.biz/tips/bash-aliases-mac-centos-linux-unix.html
- https://github.com/vikaskyadav/awesome-bash-alias
Final Thoughts
If you’d like more articles on productivity hacks, let me know in the comments! :) Also, shoutout to Raimi Karim for reviewing this article.
Support me! — If you like my content and are not subscribed to Medium, do consider supporting me and subscribing via my referral link here (NOTE: a portion of your membership fees will be apportioned to me as referral fees).
